Automate Your Post-Deployment Steps Using Puppeteer
Automate Post-Deployment Steps
Post-deployment steps are a pain. They are challenging to document and execute - especially during a time sensitive launch. Certain deployment tasks in Salesforce cannot be automated through the metadata API. Having a team member click through the setup menu to execute post-deployment steps is very manual and error prone. This risk can be mitigated with some automation tools.
In this post, we will describe how you can automate a common post-deployment step: the activation or deactivation of a flow.
Overview
There are three main tools we need to perform this automation:
The automation for activating or deactivating a flow has a few steps:
- Validate Command-Line Arguments
- Fetch Salesforce Credentials and Construct a Login URL
- Fetch the Id of the Specified Flow
- Navigate to the Specified Flow and Activate/Deactivate
Validate Command-Line Arguments
This automation will be executed from the command line, so we need to ensure that we have all the required information passed to the command. Here, we verify that there are two flags, and that the second flag contains the value Activate or Deactivate.
const ACTIVATE = "Activate";
const DEACTIVATE = "Deactivate";
const FLAGS_REQUIRED =
  "The DeveloperName of the flow, as well as `Activate` or `Deactivate` must be passed as a command line argument.";
const INVALID_MODE = "The second argument must be `Activate` or `Deactivate`";
const TOO_MANY_ARGS = "There should be exactly two command line arguments";

function validateArguments(myArgs) {
  if (myArgs.length == 0 || myArgs.length == 1) {
    throw new Error(FLAGS_REQUIRED);
  }
  if (myArgs[1] != ACTIVATE && myArgs[1] != DEACTIVATE) {
    throw new Error(INVALID_MODE);
  }
  if (myArgs.length > 2) {
    throw new Error(TOO_MANY_ARGS);
  }
}
Fetch Salesforce Credentials and Construct a Login URL
In this example, we assume that the running user has already authenticated into the target Salesforce org at least once. Here, we use the sfdx force:org:display command to fetch the access token for the user. We then use frontdoor.jsp to construct a login URL and gain access to the Salesforce org.
const { execSync } = require("child_process");
const OPEN_ORG = "sfdx force:org:display --verbose --json";
const FRONT_DOOR = "/secur/frontdoor.jsp?sid=";

function getLoginUrl() {
  const stdout = execSync(OPEN_ORG).toString();
  const outputObject = JSON.parse(stdout);
  return (
    outputObject.result.instanceUrl +
    FRONT_DOOR +
    outputObject.result.accessToken
  );
}
Fetch the Id of the Specified Flow
Now that we have authenticated into the Salesforce org, we must query for the Id of the Flow that we care about.
const { execSync } = require("child_process");

const NO_FLOW_FOUND = "No flow found with that DeveloperName";

function getFlowQuery(flowDeveloperName) {
  return `sfdx force:data:soql:query --query "SELECT LatestVersion.Id FROM FlowDefinition WHERE DeveloperName = ‘${flowDeveloperName}‘" --usetoolingapi --json`;
}

function getFlowId(flowDeveloperName) {
  let response = undefined;
  const stdout = execSync(getFlowQuery(flowDeveloperName)).toString();
  const outputObject = JSON.parse(stdout);
  if (
    outputObject &&
    outputObject.result &&
    outputObject.result.records &&
    outputObject.result.records.length > 0
  ) {
    response = outputObject.result.records[0].LatestVersion.Id;
  }
  if (response == undefined) {
    throw new Error(NO_FLOW_FOUND);
  }
  return response;
}
Navigate to the Specified Flow and Activate/Deactivate
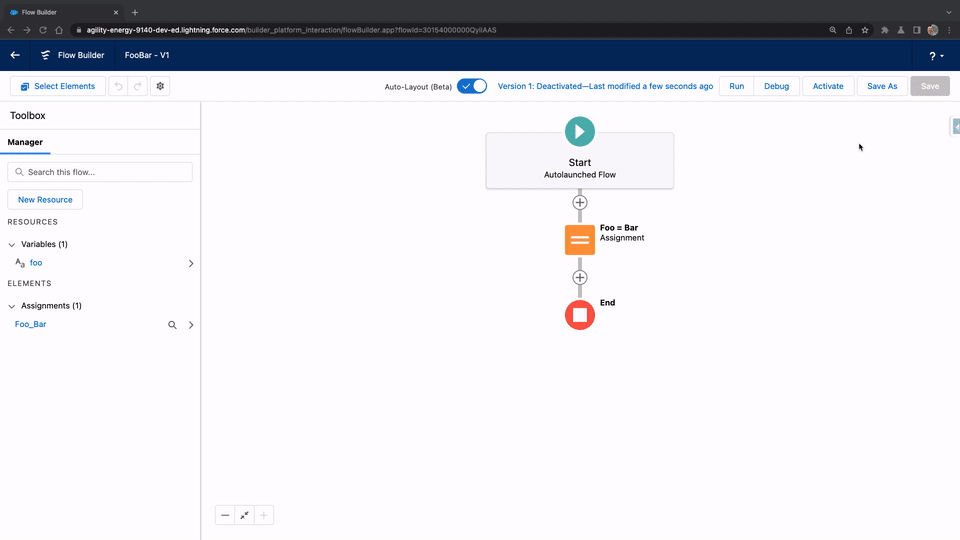
Now we have authenticated, can gain access to the user interface, and have the Id of the flow we care about. Next, we will use Puppeteer to navigate to that Flow on the user interface. Once at that flow’s screen, we will click the Activate/Deactivate button.
Notice how Puppeteer also takes screenshots of the before and after of the button press - this is very useful for auditing.
const puppeteer = require("puppeteer");

const DOUBLE_SLASH = "//";
const JS_PATH_FOR_TOGGLE_BUTTON = "#toggleFlowStatusButton-8 > button";
const FLOW_AFTER_BUTTON_PRESS_IMAGE = "afterButtonClick.png";
const FLOW_ALREADY_IN_STATE =
  "The flow is already in the requested state - no modifications will be made";
const FLOW_BEFORE_BUTTON_PRESS_IMAGE = "beforeButtonClick.png";
const NAVIGATE_TO_LOGIN = "Navigating to login URL";
const NAVIGATE_TO_FLOW = "Navigating to flow page";
const SLASH = "/";

const WINDOW_SIZE = `--window-size=1920,1080`;
const PUPPETEER_OPTIONS = {
  args: [WINDOW_SIZE],
  defaultViewport: {
    width: 1920,
    height: 1080,
  },
};

function getFlowBuilderUrl(flowId) {
  return `/builder_platform_interaction/flowBuilder.app?flowId=${flowId}`;
}

function getClickButtonMessage(action) {
  return `Clicking "${action}" button`;
}

function getSuccessMessage(flowDeveloperName, action) {
  return `Successfully ${action}d the ${flowDeveloperName} flow`;
}

async function setFlowStatus(flowDeveloperName, action) {
  console.log(NAVIGATE_TO_LOGIN);
  const browser = await puppeteer.launch(PUPPETEER_OPTIONS);
  const page = await browser.newPage();
  await page.goto(getLoginUrl());

  const pageUrl = await page.url();
  const pathArray = pageUrl.split(SLASH);
  const baseUrl = pathArray[0] + DOUBLE_SLASH + pathArray[2];
  const flowUrl = baseUrl + getFlowBuilderUrl(getFlowId(flowDeveloperName));

  console.log(NAVIGATE_TO_FLOW);
  await page.goto(flowUrl);
  await page.waitForTimeout(3000);

  const element = await page.waitForSelector(JS_PATH_FOR_TOGGLE_BUTTON);
  const currentButtonText = await element.evaluate((el) => el.textContent);

  if (currentButtonText != action) {
    console.log(FLOW_ALREADY_IN_STATE);
  } else {
    await page.screenshot({ path: FLOW_BEFORE_BUTTON_PRESS_IMAGE });
    console.log(getClickButtonMessage(action));
    await page.click(JS_PATH_FOR_TOGGLE_BUTTON);
    await page.waitForTimeout(2000);
    await page.screenshot({ path: FLOW_AFTER_BUTTON_PRESS_IMAGE });
    console.log(getSuccessMessage(flowDeveloperName, action));
  }
  await browser.close();
}
Put it Together
Let’s put it all together in a nice main function and make it so that our logic can be executed from the command line.
function main() {
  const myArgs = process.argv.slice(2);
  validateArguments(myArgs);
  setFlowStatus(myArgs[0], myArgs[1]);
}

main();
$ node scripts/setFlowStatus.js FooBar Activate
Voilà! The system will now automatically activate or deactivate the latest version of a flow for you.
You can now build scripts like this into your team’s DevOps pipeline to reduce risk and human intervention in your delivery process.